From Humble Beginnings
To the one of the most technologically advanced neighborhood light shows in Central Ohio.
Who we are
About us and our story

TL;DR
Go straight to the nerdy tech stuff!
Sometime in the late 80’s and early 90’s
One of the creators of the LDP light show, Byron Gunter, started saving his allowance money to buy Christmas lights. Soon, his display and efforts attracted the local news media and Byron was officially hooked on lights!
In 2014 Byron bought a house in Lucy Depp Park (the one the donation box) and realized that he had a perfect canvas in the ravine/trees for Christmas lights. The first couple of years was simply a static display.
Later in 2015 LDP got some new homeowners. Enter the Rhodus family. Kevin Rhodus has some background in theater, show control and networking. The guys got to talking and decided to put together a light show. The first show year, 2017, was just Kevin and Byron’s house using just Light-O-Rama controllers. (More on that in a minute in the tech section).
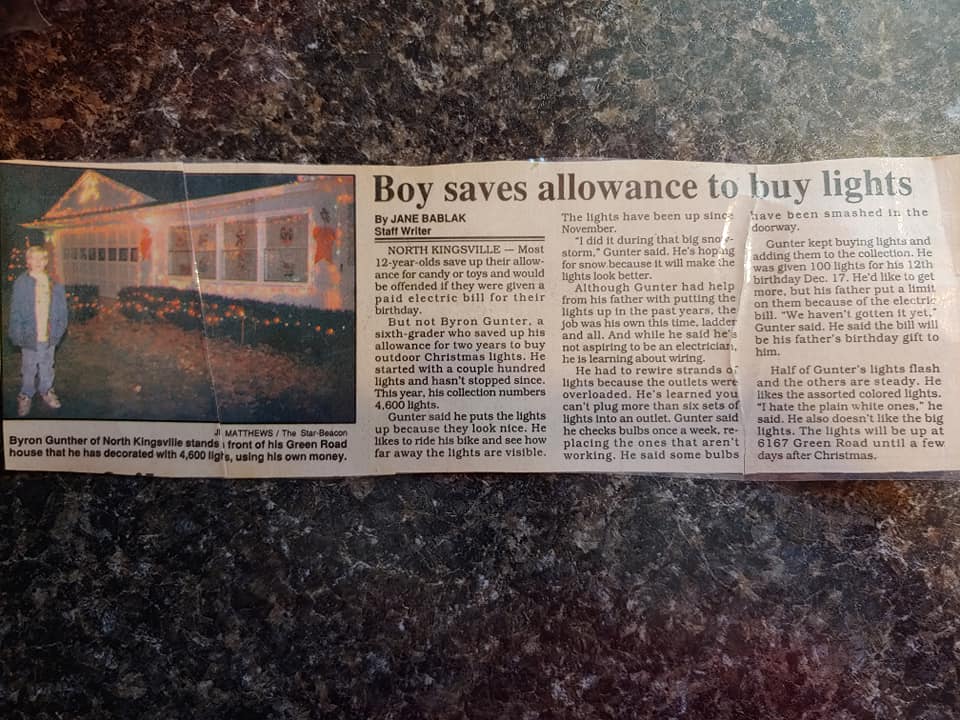
From the 1992 Ashtabula Ohio Star Beacon. Since those early days our LDP show has been featured in magazines and on countless websites.
In the second show year Dave Johnson got on board to add a third house to the show. Since then, almost every year we’ve added neighbors (we’re up to 9 houses), acreage (and complexity!) to the show. It’s created a community in our neighborhood that we think is pretty cool. We have planning meetings, go out to dinner together, have walkie-talkies to communicate, and fires–lots of fires. And if you see a tractor or four-wheeler going down the street, it’s probably Dave, Kevin, Jay, Steve, Roland or Byron hanging some last minute lights or fixing something–make sure to wave hello!
Now for the fun part–how we make it work!
Step 1: Hanging and Wiring the Lights
We officially start in late summer by planning for what we will be adding the next year. This year that involved building all the new controllers and power supplies we needed to make the pixel forest. Most of the controllers we utilize come as individual parts that we have to source and then build into enclosures to make them able to survive the weather of Ohio in winter. We then start the tedious process of hanging lights and installing all the supporting equipment. It takes 3-4 months to wrap all 12 acres of trees, bushes, and houses. Each tree gets wired back to a controller.


All of the lights in the show are now intelligent pixels. Pixels allow every single LED on the strand to be individually controller. Each pixel has 3 individually controllable channels (Red, Green, and Blue). Pixels require DC power (12v) and a data signal to be ran to each strand. Due to this, there is only a short distance we can run extensions cables to each strand. In areas with a lot of pixels, like the pixel tree, we are able to use controllers with a high output count (Kulp K16-PB). In areas where we have pixels spread out, like the pixel forest, we utilize small breakout controllers called differential receivers. These provide power and data for up to 4 strands. The differential receivers then connect back to a Kulp K40-PB controller. It takes hundreds of these differential receivers to power and control the entire show.
Each controller (26 at last count) contains a mini-computer (either a Raspberry Pi or BeagleBone). This mini-computer runs software called Falcon Pi Player (FPP). Each controller has a copy of the show file on it and plays back the appropriate channels. The players are all connected to our show network to be able to synchronize and recieve programming updates.


To be able to cover all 12 acres, the show network utilizes Ubiquiti wireless point to multipoint antennas. There is one main antenna (RocketStation M5) that the 5 remote antennas (NanoStation 5AC Loco) installed around the neighborhood all connect to. While similar to Wifi, these antennas are extremely directional and support much longer ranges and faster speeds. The furthest antenna in the show this year is almost 1/10 of a mile away from the main antenna.
Each remote antenna connects different segments of the network together to make one large show network. In some areas the antenna connects directly to a controller, while in other areas they connect to network switches (Netgear GS110TP) to allow for multiple devices or areas to connect.

Step 2: Programming the Show
We use a free, open-source program called xLights for programming the show. The first step in programming the show is laying out all the lights for the show onto a virtual map of the neighborhood. This not only allows us to preview what the show will look like on screen but also allow us to apply effects across the entire show. Each strand of lights is imported and assigned their channel in the layout. We also set up groups of lights, like All LEDs, All Pixels, West Side, and East Side to make programming easier.
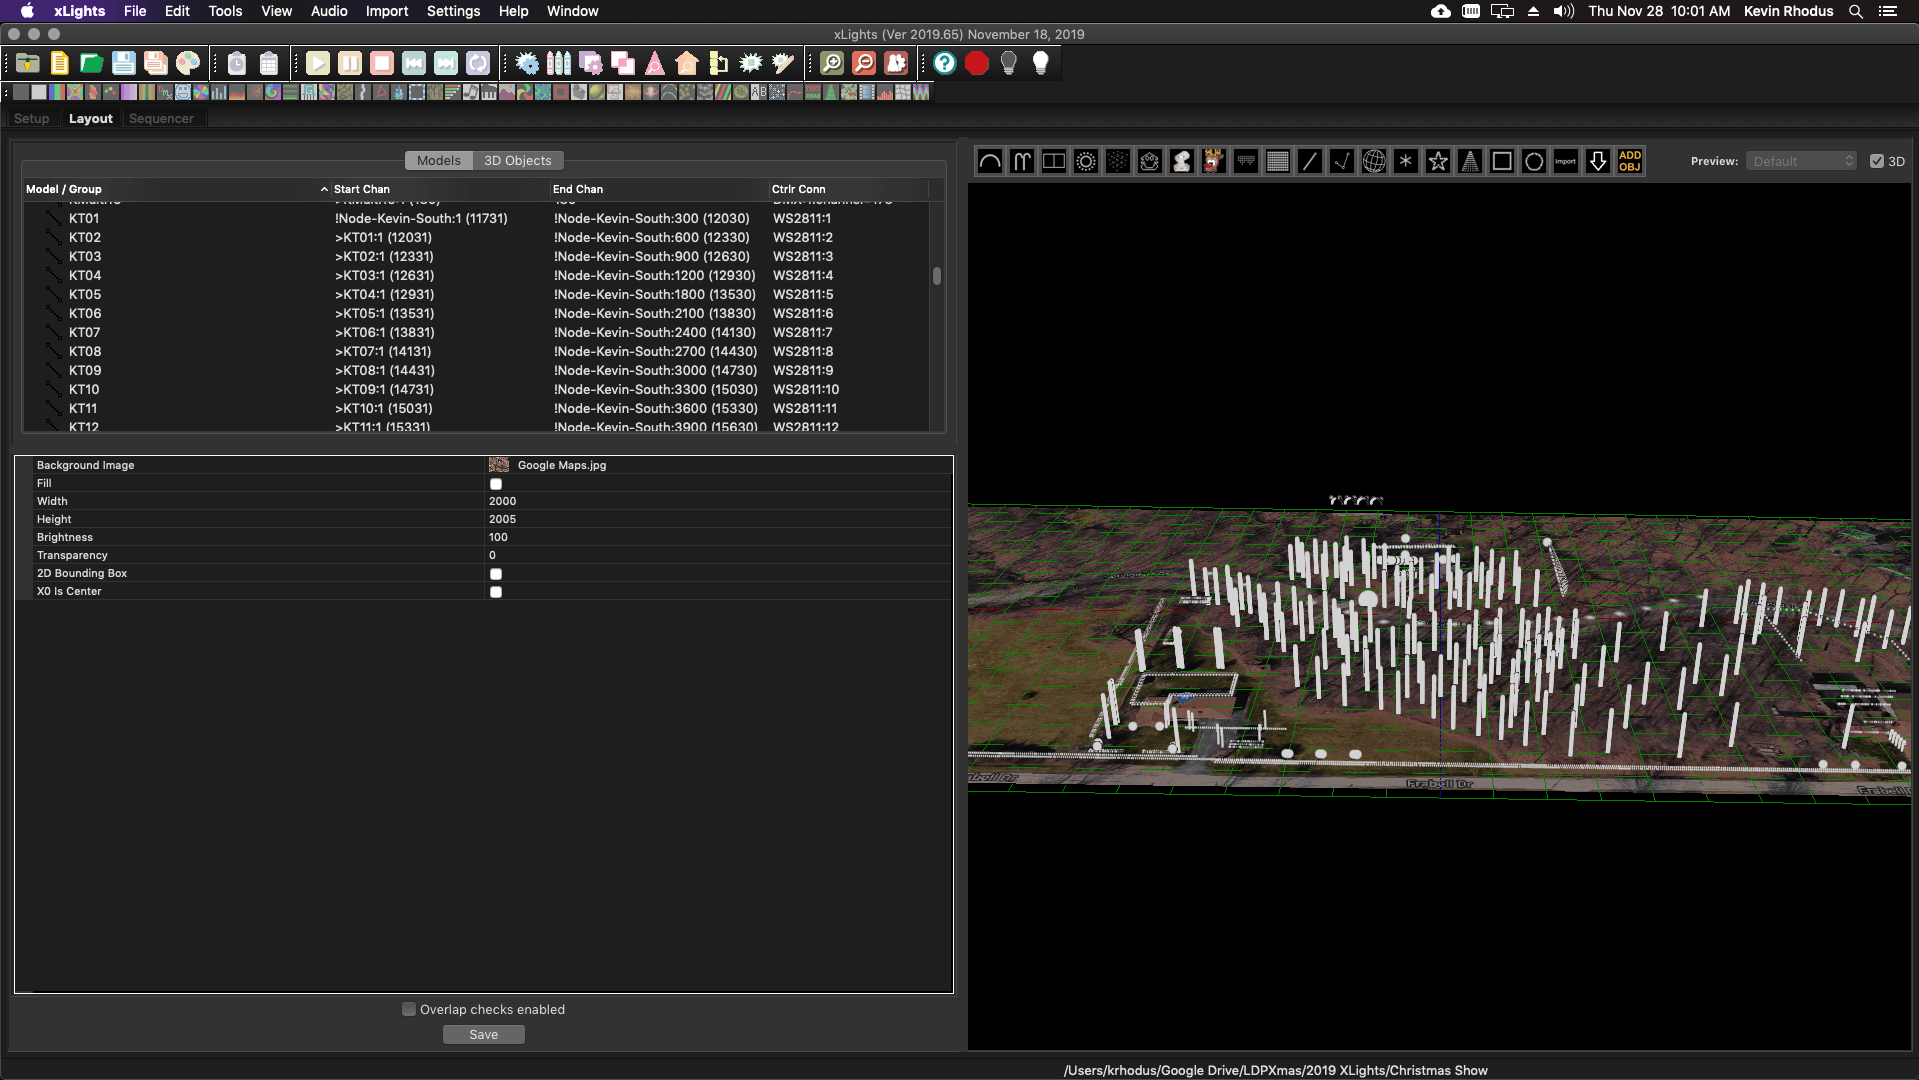
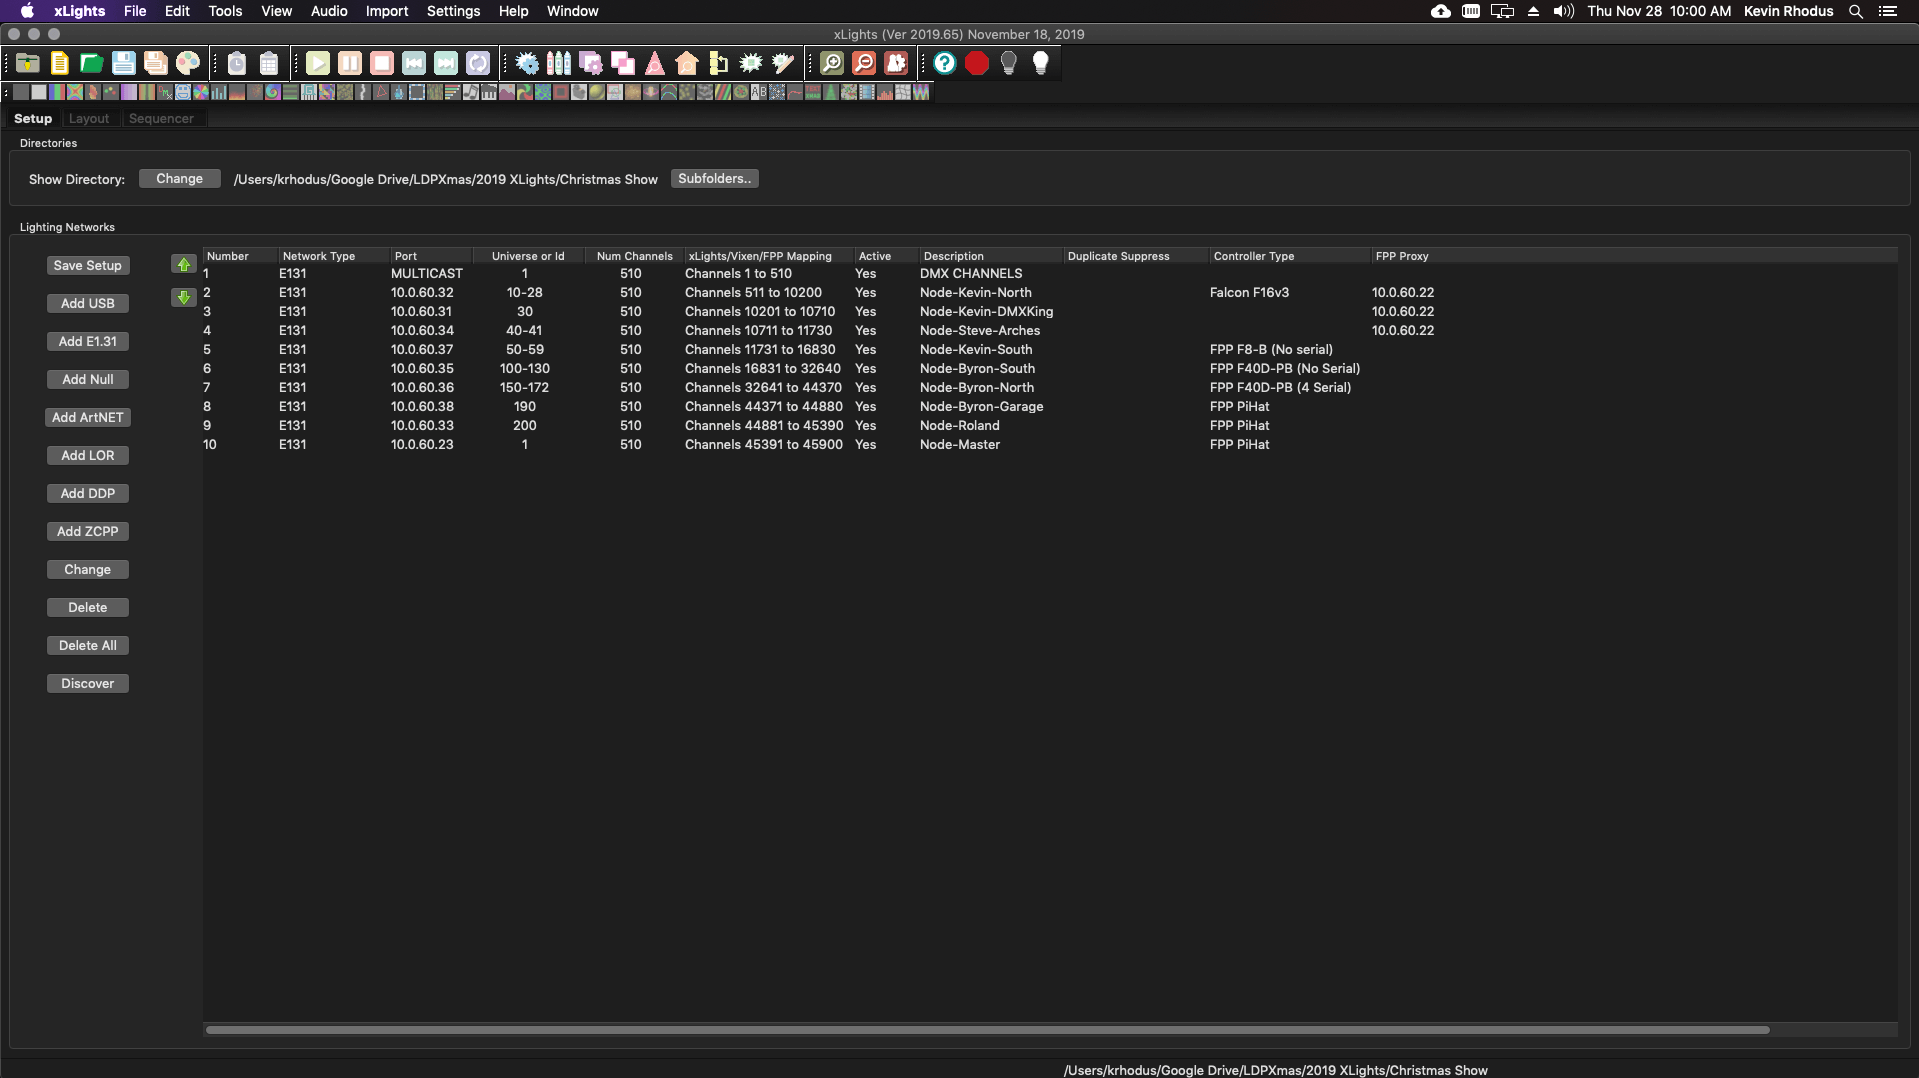
With the large number of channels (over 300,000), it is important to make sure we do not accidently overlap channels and that each channel in software matches in the controller. Luckily the software has lots of great tools to help us in doing this. We can manage all our controllers from within xLights and have it push configurations to the controllers for output channels.

Once it is all setup, then the fun of programming begins. This is by far the most tedious part of the show. The finale this year took over 25 hours to program. When programming, we are able to view the show on the 3D model from multiple angles to see what the show looks like from all the different vantage points. However, nothing beats actually going outside and watching the show. We spend countless hours driving around the neighborhood in the months leading up to the show watching the show from every possible angle.
Step 3: Running the Show
Once the show is programmed, we load the compiled show into each controller. One controller is designated as the main controller, while the others are all setup as remote controllers. The main controller contains the schedule for when the show should play as well as all the audio files for the show. This controller is connected to the FM transmitter that allows everyone to hear the show. When playing, the main controller sends out a synchronization message to each remote player once a second for what sequence to play and what time it is at.


Since there are so many parts required to make the show run correctly, we utilize a custom written control system to monitor and control the show. This control system is running on a Q-SYS Core processor. From the user interface, we are able to quickly view the status of each and every device utilized in the show. We are also able to manually start and stop playlists from the interface. In addition we are able to remotely control the show and turn on and off the lights via two-way radios from anywhere around the neighborhood.


In addition to being able to monitor the entire show system via the user interface, we also have it tied to a cloud monitoring platform. This allows us to be able to login from anywhere in the world and check on the status of each and every thing required to make the show run. The cloud platform also allows to proactively monitor the show. Anytime one of the required devices is unavailable, we recieve an email alert. In addition to monitoring the controllers and network equipment, we are able have more advanced logic that is constantly checking that the show is running on each controller, all the devices are functioning and that the FM audio signal is able to be recieved.

Want to Nerd Out Even More?

Click here to visit Light Show Network – a collection of articles, webinars, and other technical documentation on how we pull off our show.
